HR Admin
Introduction:
HRMS is an indigenous application that helps the Organization to accumulate and maintain Human Resource data. This document illustrates the HR admin role in HRMS. Here we cover the following topics in detail
Getting Started:
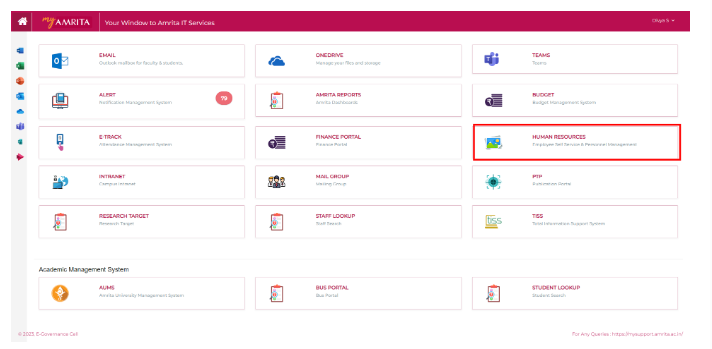
To access Human Resource Management System
Open an internet browser (Recommended to use Google Chrome)
Type https://my.amrita.edu/ and click enter
Login with your Amrita email credentials
Click HUMAN RESOURCES.
How to create a Department?
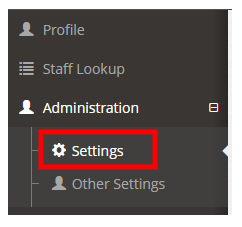
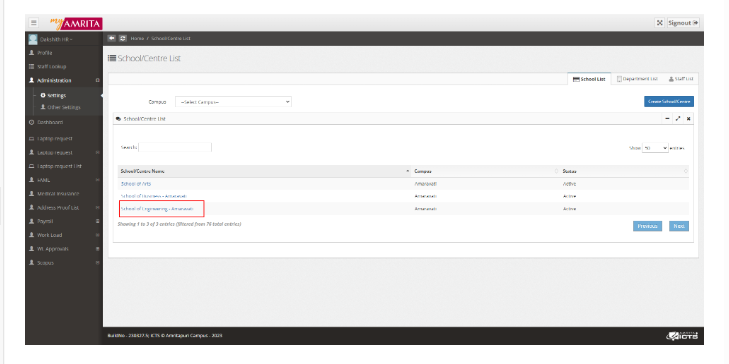
Go to Administration -> Click Settings
Click on the School name under which the department needs to be created.
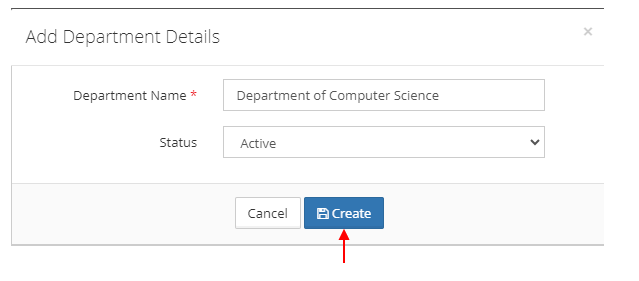
Click on the Add button.
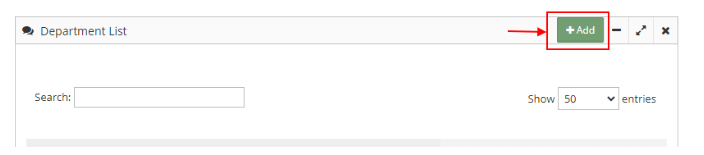
Enter the Department Name
Select Status as Active
Click Create button
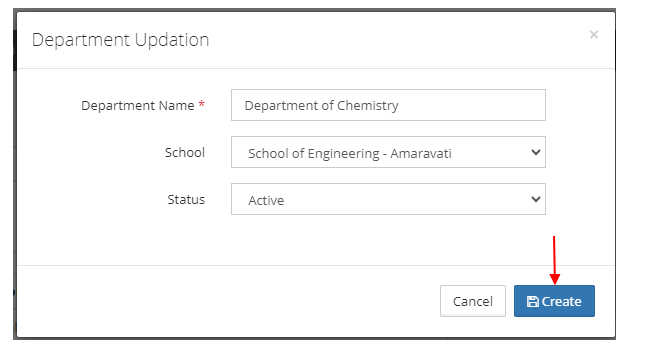
How to Edit a Department?
Click on the department name
Click on the edit button
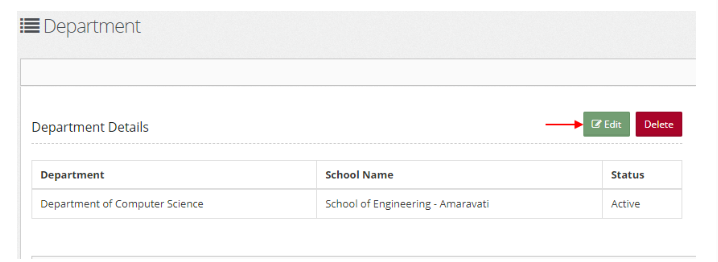
Update the details and click on the Create button.
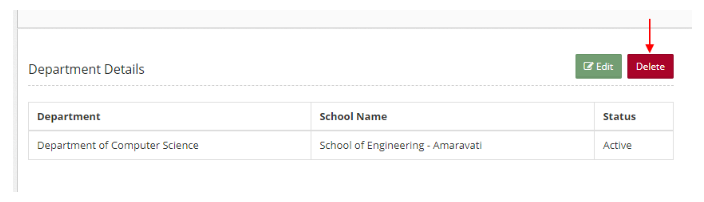
How to Delete a Department?
Click on the Delete button
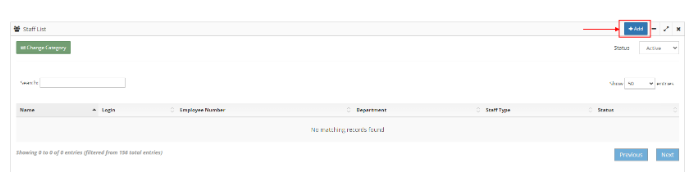
How to add Staff/Users to a department?
Click on the Add button in the staff list to add a staff
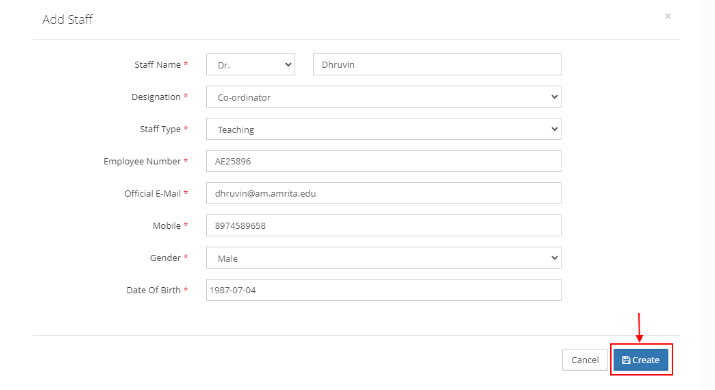
Enter staff details
Click on Create button
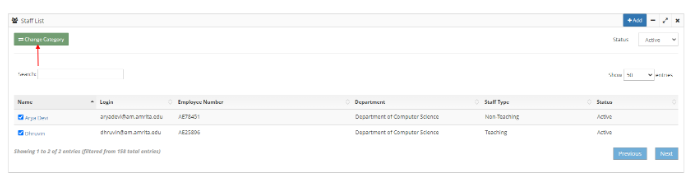
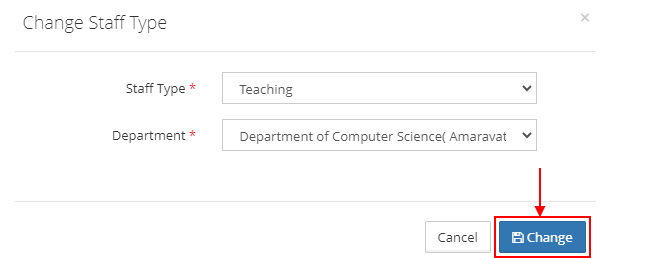
How to change the staff category/Department?
Check the checkbox corresponding to the staff name
Click on the Change Category button to change the staff type/department of a staff
Update the details and click on the Change button
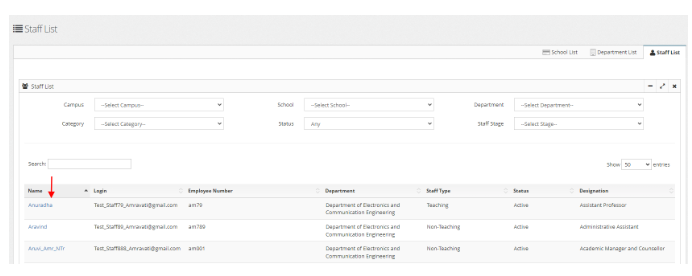
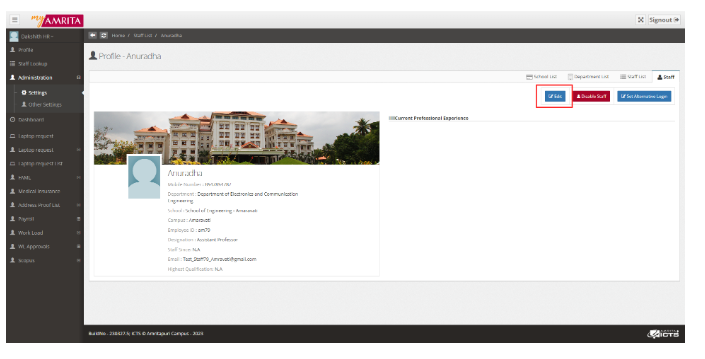
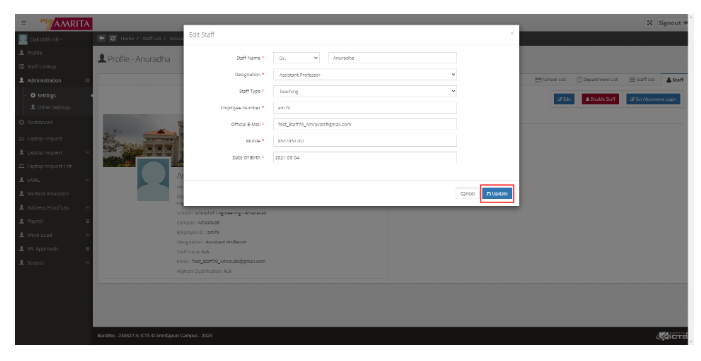
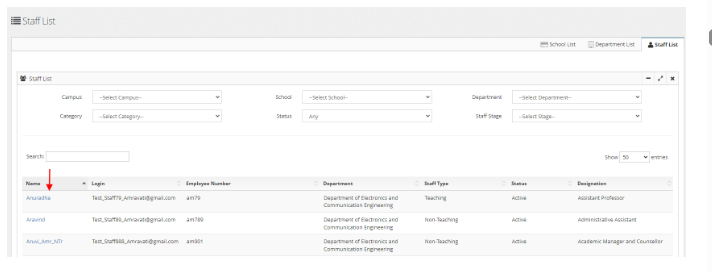
How to edit staff details?
Click on the staff name under Staff List.
Click on the Edit button
Edit the details and click on the Update button
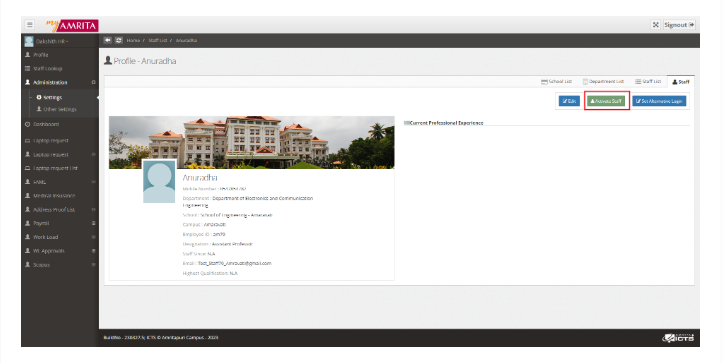
How to Disable a Staff?
Click on the staff name under Staff List.
Click on the Disable Staff button
Click OK

How to re-enable a Disabled staff?
Click on the Staff list
Select Inactive for the status dropdown and apply the filter.
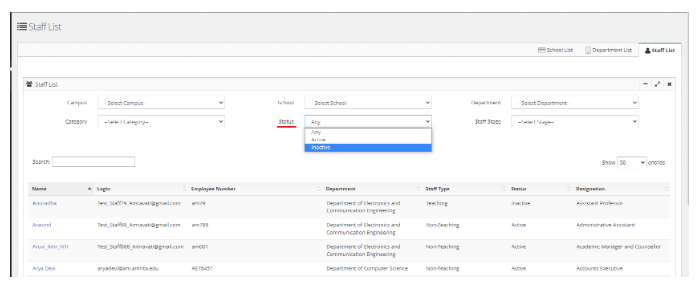
Click on the staff name
Click on the Activate Staff button
Click on OK
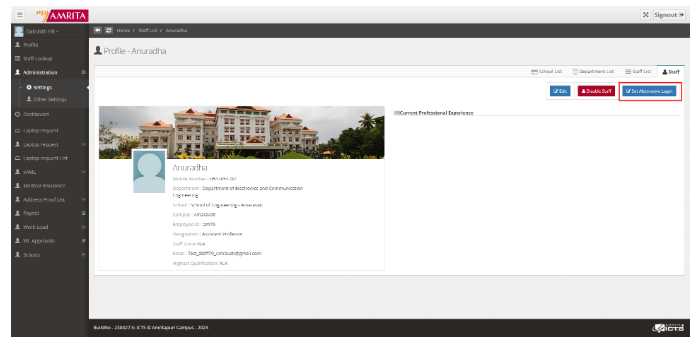
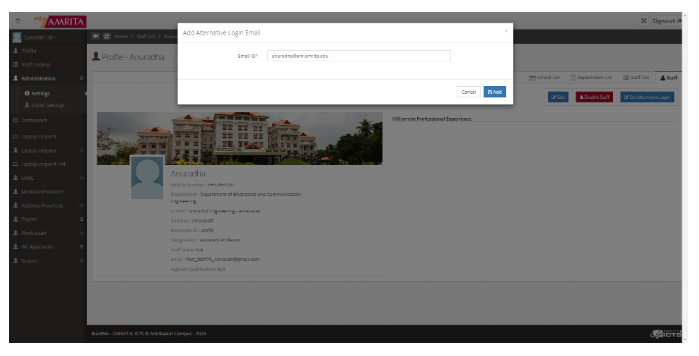
How to set an Alternative Login for a staff?
Click on the staff name under Staff List.
Click on the Set Alternative Login button.
Enter alternative login Email ID
Click on the Add button
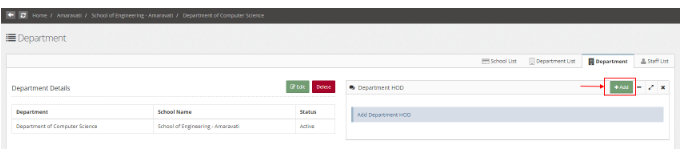
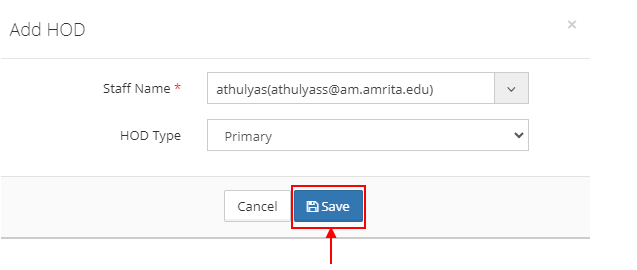
How to assign HOD to a Department?
Click on the Add button
Select the staff name from the drop-down
Select the HOD Type.
Click on the Save button.
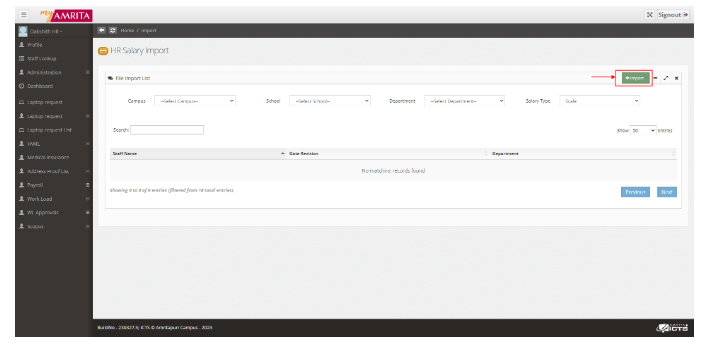
How to import salary package :
Click on Dashboard
Click on GO TO button
Select Salary Package Import

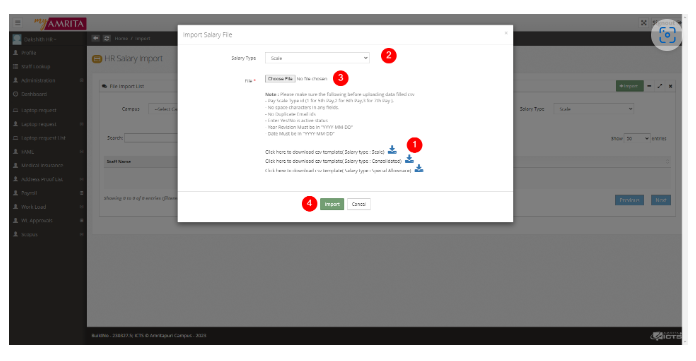
Click on the Import button
Download the CSV template depending on the salary type and fill in the data.
Select Salary Type from the drop-down
Click the Choose File button and browse the data-filled CSV file
Click the Import button at the bottom
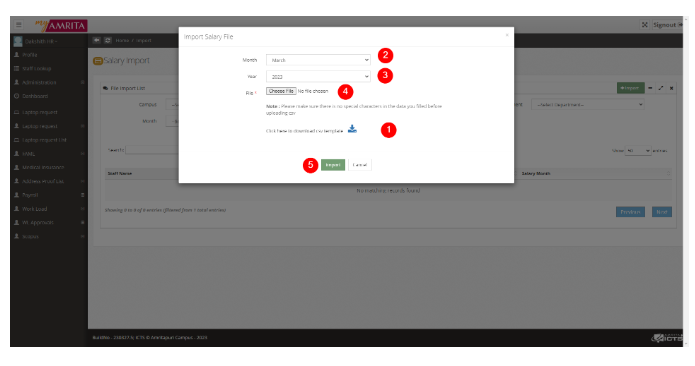
How to import monthly salary :
Click on Dashboard
Click on GO TO button
Select Monthly Salary Import
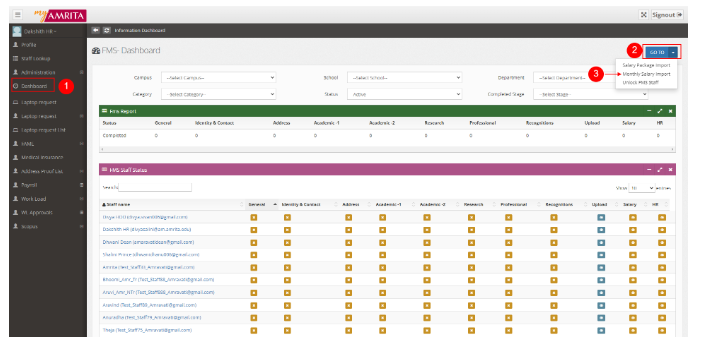
Click on the Import button
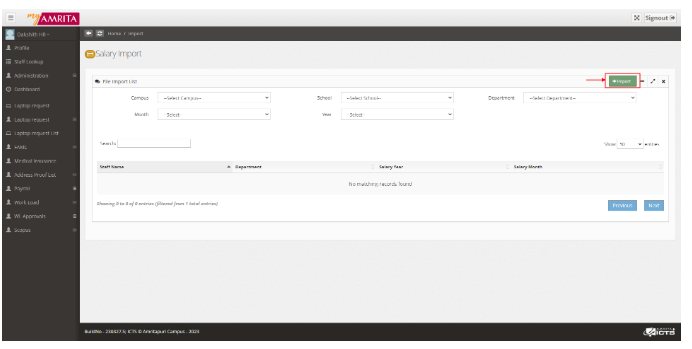
Download the CSV template and fill in the data.
Select Month
Select Year
Click the Choose File button and browse the data-filled CSV file
Click the Import button at the bottom
How to Unlock FMS for a staff
FMS in HRMS will be a scaffolding for HR-related processes of staff joining the organization. The HR will create a user account for new staff and all staff should fill in the details in FMS. Once the account has been created, the joining date should be specified on the HR page of the newly joined staff's FMS. New staff will get 15 days starting from the joining date mentioned on the HR page to fill in the FMS details. After 15 days, the FMS pages will be locked and the staff needs to contact the HR department for further correction/update of details.
Here describes how an HR admin Lock / Unlock FMS for individual staff in HRMS.
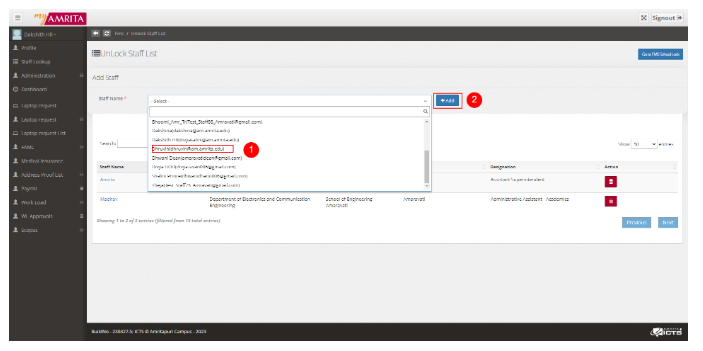
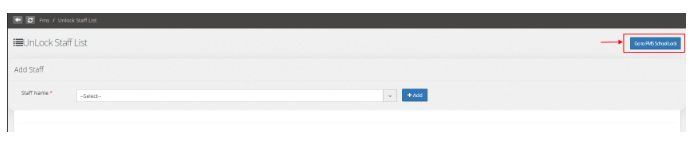
Unlock FMS for a Staff
Click on the Dashboard
Click on GO TO button
Click on Unlock FMS Staff

Select the Staff Name from the drop-down
Click on the Add button
Staff whose FMS is unlocked are listed
Lock FMS for a Staff:
Click on the Delete button corresponding to the staff
The staff's FMS will get locked and the name is removed from the Unlocked staff list.
How to lock & unlock FMS school wise
Lock/Unlock FMS of School:
Click on the Dashboard
Click on the GoTo button
Click on Unlock FMS Staff
Click on the Goto FMS SchoolLock
Click on the particular school, which you need to unlock(Staff-Yes/No). Yes means lock and No means unlock as shown below.

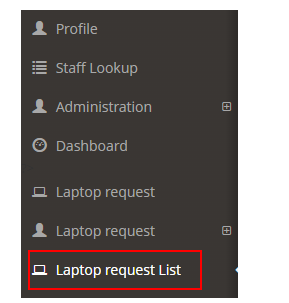
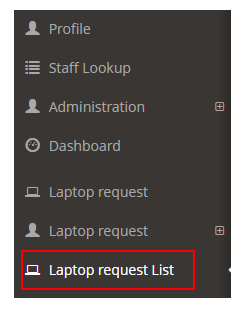
Laptop Request
When faculty member logs into HRMS, they can request a laptop by accessing the Laptop Requestoption on the left-side menu. This option opens up a submenu that includes two options:
Laptop Request Form
Laptop Request List-ICTS
Here describes how the laptop request passes through different approval stages. There are three approval stages through which the staff's laptop request has to get through.
ICTS Approval
HR Approval
Head of the Institution / Principal Approval
Let us go through each approval one by one.
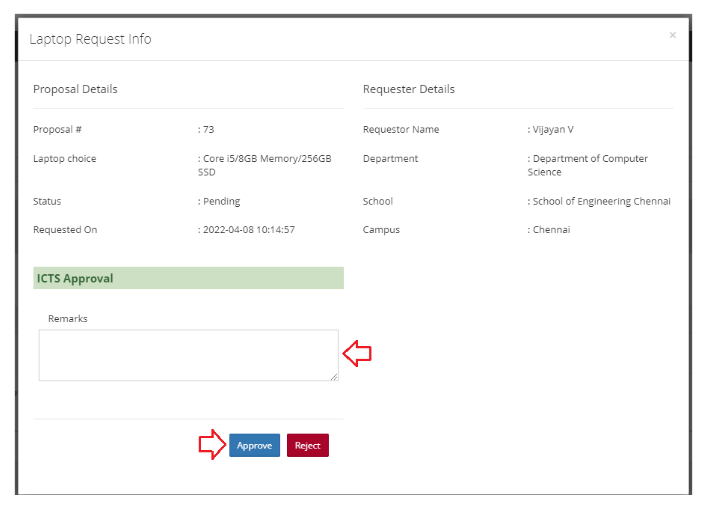
ICTS Approval:
The ICTS admin will do the laptop request approval on behalf of the ICTS department.
Once the ICTS-admin login, click on the Laptop request list at the left side menu.
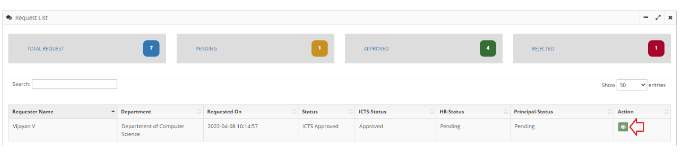
The list of laptop requests will be displayed under the tab 'ICTS'.
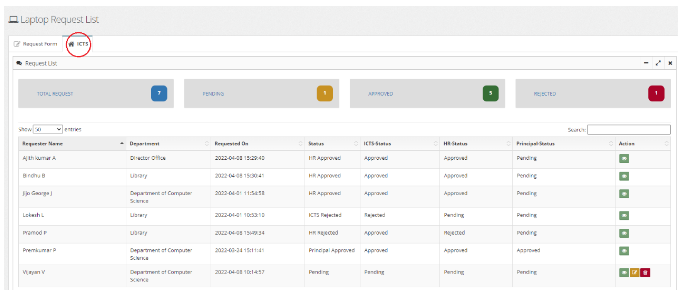
Click on PENDING count to display the list of approval pending requests alone.
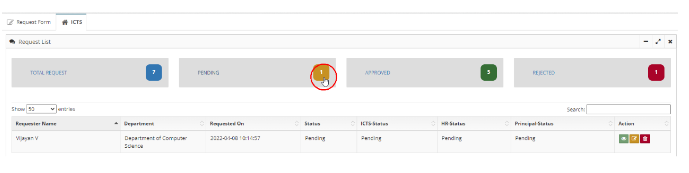
Click on the View button against the request to open and view the details.
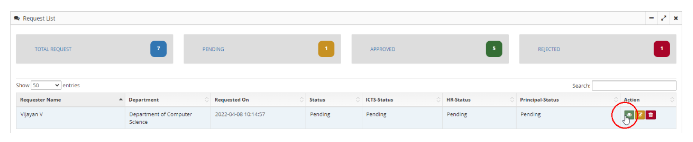
The laptop request Info page will open. Add Remarks and click on the Approve button.
The ICTS admin can reject the request by clicking the Reject button if required.
HR Approval:
Once the ICTS-admin approves the request, HR-admin needs to approve to proceed further.
Login as HR-admin, click on the Laptop request list at the left side menu.
The list of laptop requests will be displayed under the tab 'HR'.
Click on Pending count to display the list of approval pending requests alone.

Click on the View button against the request to open and view the details.
The laptop request Info page will open. Add Remarks and click on the Approve button.
The HR admin can reject the request by clicking the Reject button if required.

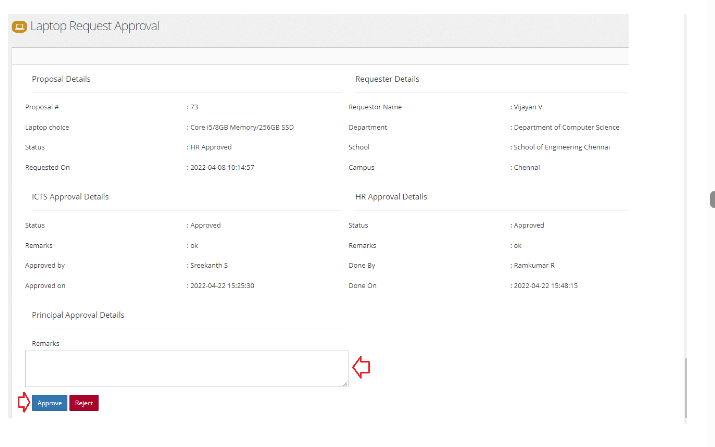
Head of the Institution / Principal Approval:
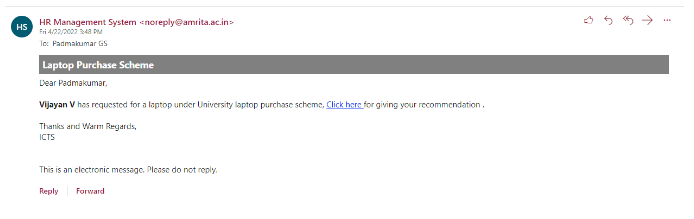
Once the HR admin approves, an automatic email will be sent to the Head of the Institution / Principal.
Click on the Click here link in the email body to open the Laptop request approval page.
Add Remarks in the remarks text box. Click on the Approve button.
The head of the Institution / Principal can reject the request by clicking the Reject button if required.
Medical Insurance
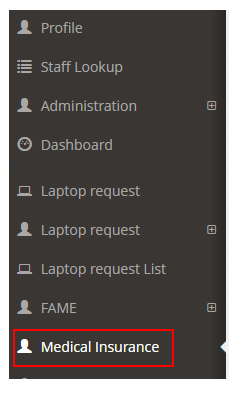
Admin can add their medical insurance by accessing the Medical Insurance option on the left-side menu.
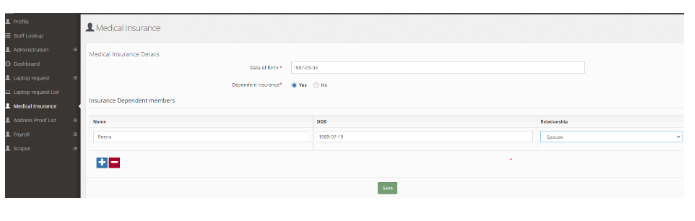
Add Date of birth.
Admin can also add insurance for Dependent members by clicking on 'Yes'.
Click on the Save button
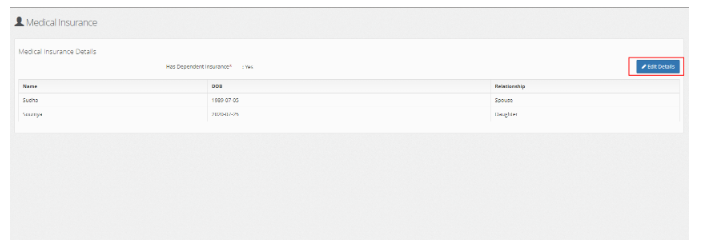
Admin can edit insurance details by clicking on the Edit Details button.
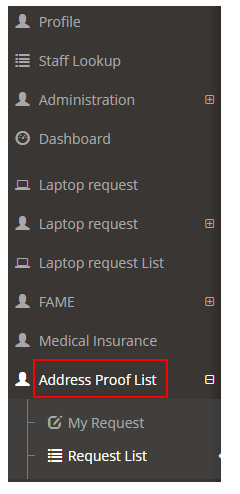
Address Proof List
The staff can send address proof requests to the HR admin through the HRMS portal.
Admin can send address proof requests for himself by clicking My Request and can view the requests sent by staff by clicking Request List by accessing the Address Proof option on the left-side menu.
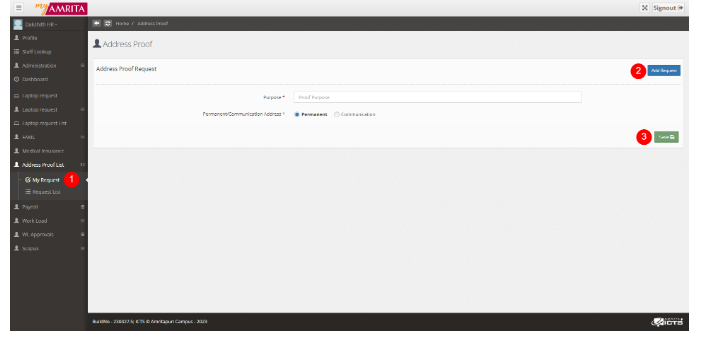
Click on My Request
Click on Add Request button
Enter purpose and address type
Click on Save button
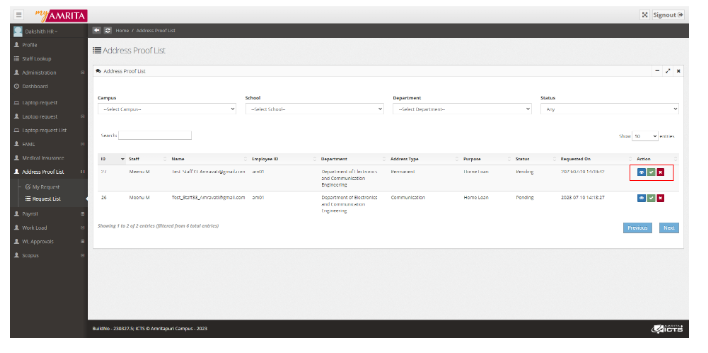
Click on Request List to view the Address proof requests sent by the staff.
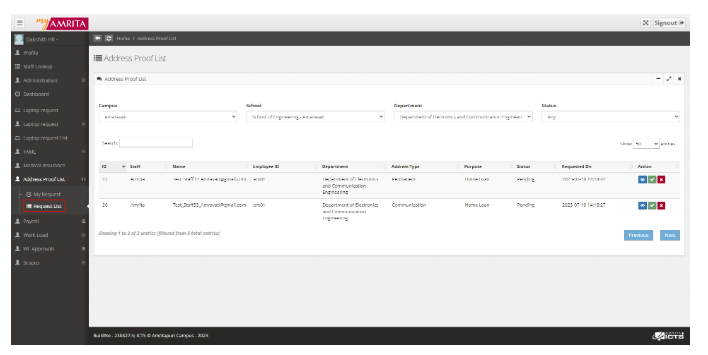
Admin can sort the requests based on Campus, School, Department, and Status
Click on the Approve button to approve the request.
Click on the View button to view and download the request.
Click on the Cancel button to cancel the request.
Payroll
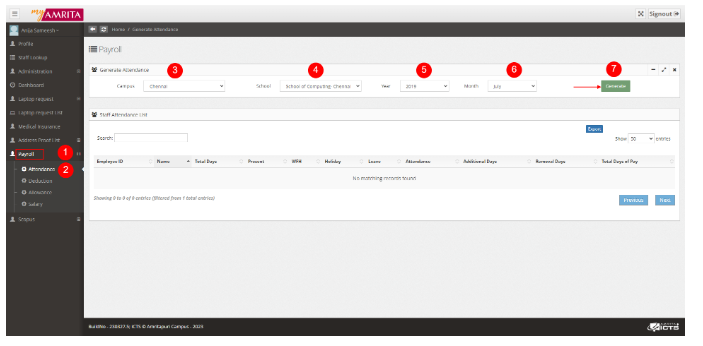
Follow the below steps to generate the attendance report:
Click on the payroll
Select the Attendance
Select the Campus
Select the School
Select the Year
Select the Month
Click on the Generate button
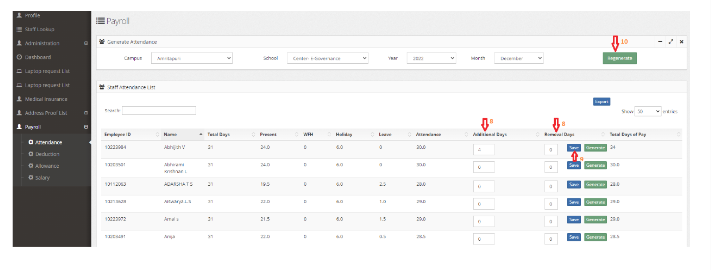
If any changes in attendance need to be done, then the admin can either add or reduce the no of days.
After each update click on the save button.
If the admin needs to undo the changes, click on the Regenerate button.
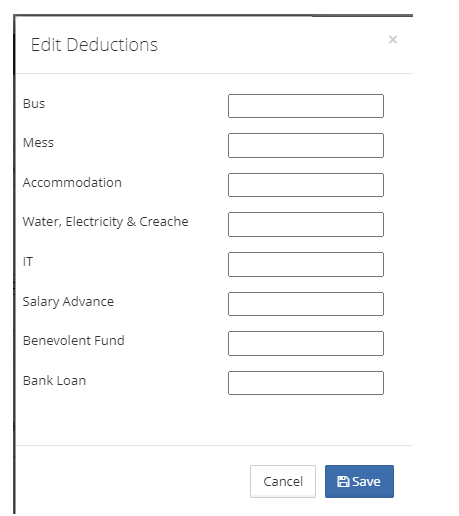
Deductions
The deduction of the amount can be added to staff either individually or by bulk upload.
For individual entries, click on the Edit option.

Enter each deduction amount in the pop-up window and click on the Save button.
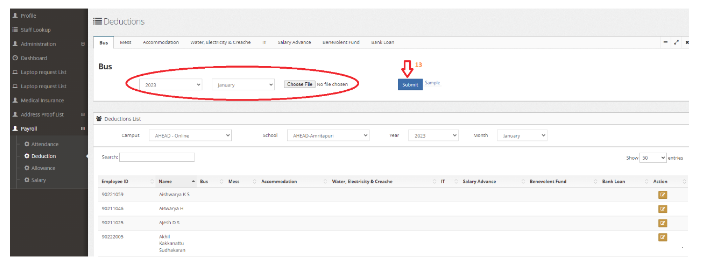
For bulk entry, you can go to each deduction session, and upload the deduction amount in the sample format provided.
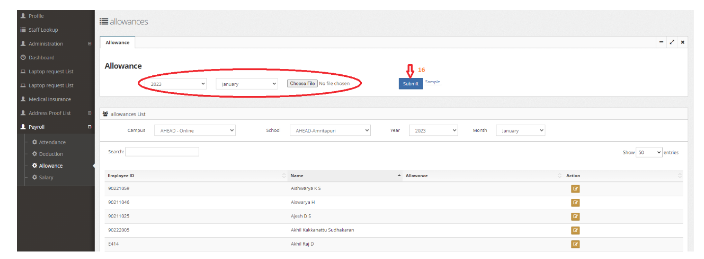
Allowance
Allowance amount can be added to staff either individually or by bulk upload.
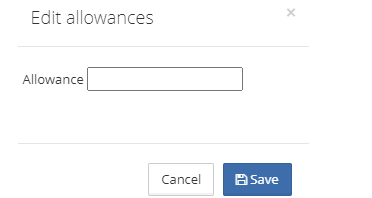
For individual entries, you can click on the Edit option.
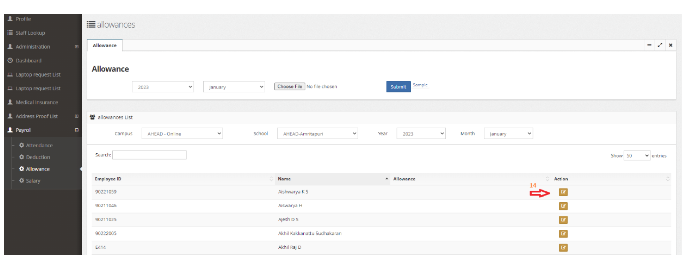
Enter the allowance amount in the pop-up window and click the Save button
For bulk entry, you can upload the allowance list in the sample format as shown below.
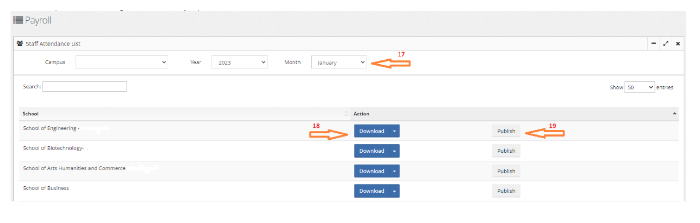
Salary
For getting the salary report of each school, follow the below steps:
Select the campus, Year, and Month. Then all the schools under the campus will be listed.
Click on the salary report to download the report of the particular school.
Click on the publish button to generate the salary slip.
Scopus
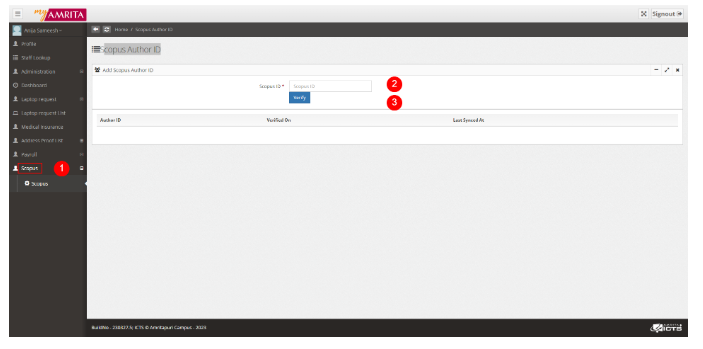
HR admin can add Scopus Author ID by clicking the Scopus in the left-side menu.
Click on the Scopus
Enter Scopus ID
Click on the Verify button
What details HR department needs to update on a Staff's HR page?
Each staff login will have an HR Page which is to be updated and maintained by the HR department.
The HR page consists of three sub-pages,
Basic Information
Other Information
Culmination of Service
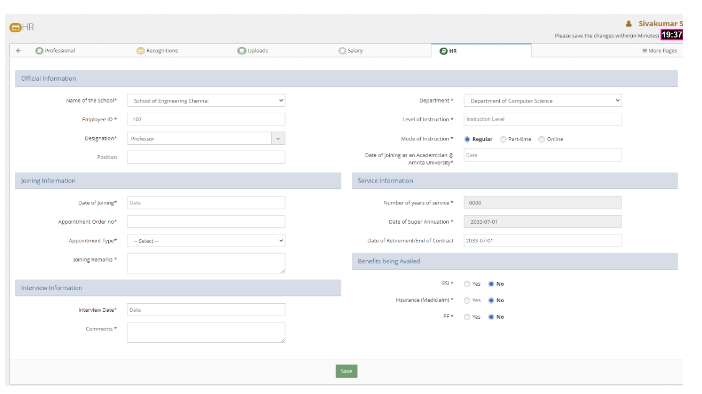
Basic Information:
By default Basic information page will be loaded when you open the HR page. The rest of the sub-pages will appear only if the basic information page is filled. The basic Information page consists of the following:
Official Information:
Depending on whether the staff is teaching or non-teaching the following details will be asked to fill
Name of the School
Employee ID
Designation
Position held
Level of Instruction
Mode of Instruction
Date of Joining as an Academician at Amrita
Joining Information:
The following joining details are to be filled
Date of Joining
Appointment Order Number
Appointment Type
Joining Remarks
Service Information:
The following service details are to be filled
Number of years of service
Date of Super Annuation
Date of Retirement / End of Contract
The number of years of service is calculated based on the Date of Joining.
The date of Super Annuation is automatically calculated based on the DOB of the staff.
Interview Information:
The following interview information is to be filled
Interview date
Any comments regarding the interview
Benefits being Availed:
Whether the following benefits are availed or not status needs to be updated
ESI
Insurance
Provident Fund
Other Information:
The other Information page will get enabled only when you fill in and save the Basic Information page.
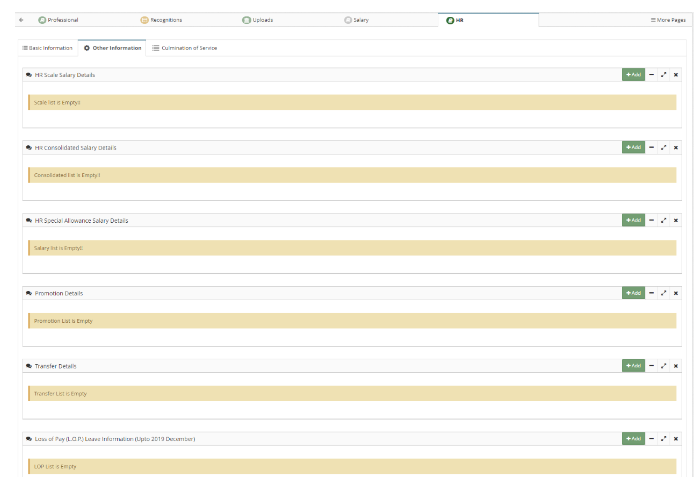
The other Information page consists of the following:
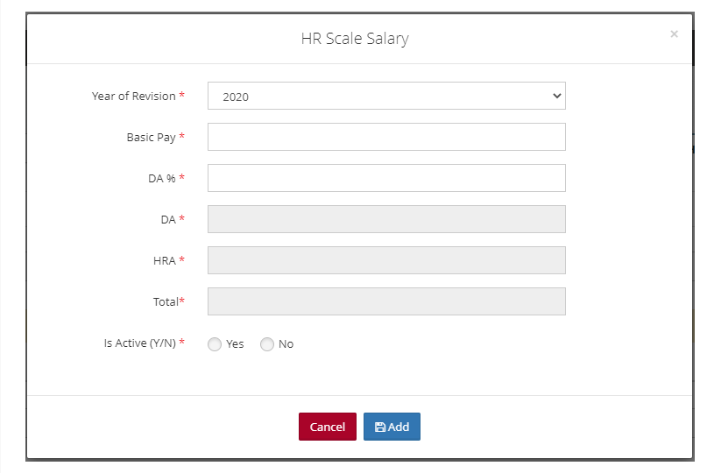
HR Scale Salary Details:
Scale Salary details can be added individually for each staff as well as through bulk import. (A separate document is available for this feature).
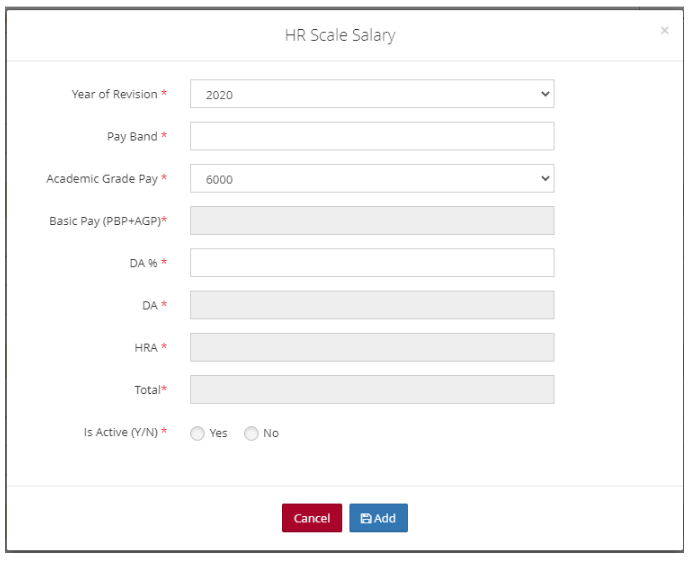
To add Scale salary individually, click on the Add button.

Here depending on whether the staff is teaching or non-teaching, the following details are to be filled in and click on the Add button.
For Teaching Staff:
Year of Revision
Pay Band
Academic Grade Pay
Basic Pay (PBP + AGP) - This is auto-calculated by the application
DA Percentage - Based on the value we provide here, DA is calculated
DA - Auto-calculated by the application
HRA - Auto -calculated by the application
Total - Auto - calculated by the application
Is Active
Non-Teaching Staff:
Year of Revision
Basic Pay
DA Percentage
DA - Auto-calculated by the application
HRA - Auto-calculated by the application
Total - Auto-calculated by the application
Is Active
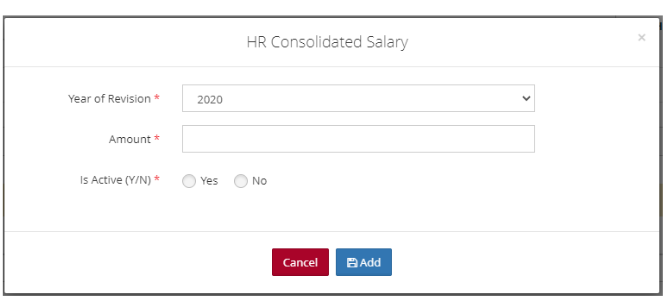
HR Consolidated Salary Details:
Consolidated salary details can be added manually as well as through bulk import.
Here to add Consolidated salary details manually one by one click on the Add button as displayed in the figure below

The following details are to be filled in and click on the Add button.
Year of Revision
Amount
Is Active
HR Special Allowance Salary Details:
Special Allowance details can be added manually as well as through bulk import.
Here to add Special salary details manually one by one click on Add button as displayed in the figure below.

special Salary window opens up. Fill in the following details and click on the Add button.
Basic Pay (On the basis of Scale and it depends on the position, qualification, and experience of the
candidate)HRA (10% of the Basic Pay)
Conveyance Allowance (Fixed amount)
Special Allowance (Special Allowance is variable from 50% to 100% of the Basic Pay, depending on the performance of the person)
Monthly Gross (Sum of the above four (BP, HRA, CA, and SA))
Effective Date (Date from which the increased pay is made effective)

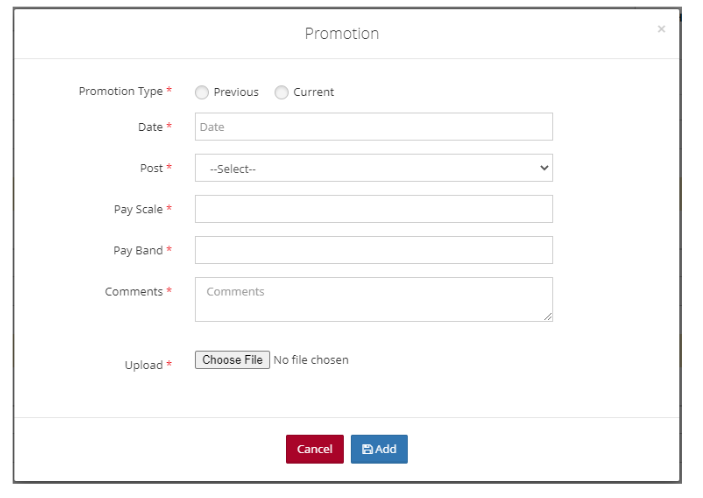
Promotion Details:
To add promotion details click on the Add button.

The promotion window opens up. Add the following details and click on the Add button.
Promotion Type
Date
Post
Pay Scale
Pay Band
Comments
File upload
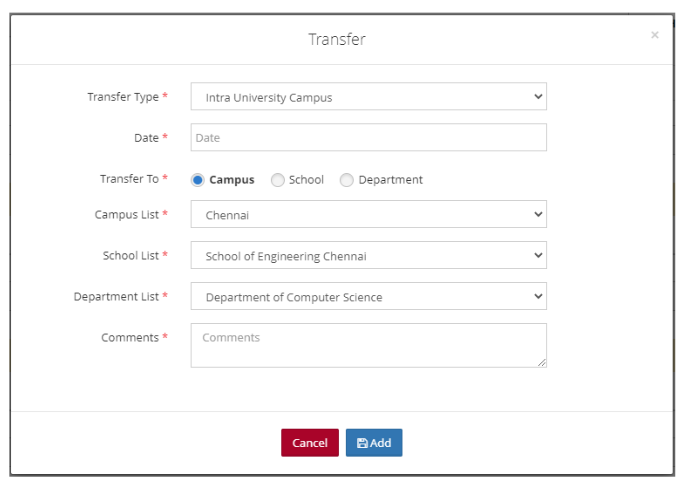
Transfer Details:
To add transfer details, click on the Add button.

Fill up the following details and click on the Add button.
Transfer Type - Choose the transfer type.
Intra -University
Inter-Department / School
Date
Transfer To - Campus / School / Department
Comments
Depending on the option you choose for "Transfer To" the following will appear
Campus List
School List
Department List
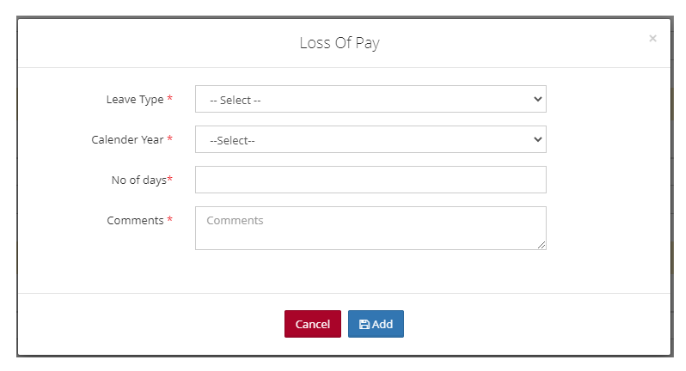
Loss of Pay:
To add Loss of Pay details, click on the Add button.

Fill in the following details and click Add button.
Leave Type
Calendar Year
No of days
Comments
Culmination of Service:
Prerequisite:
Before going to the culmination module, please make sure you have added
Notification / Dues Department
Email Template
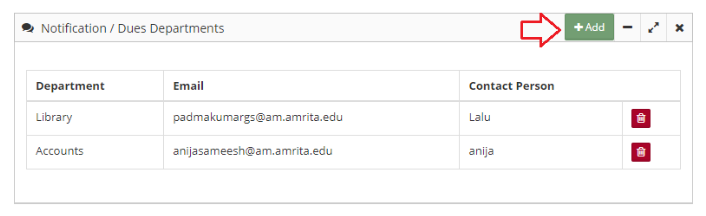
Add Notification / Dues Department:
For a staff get relieve, he/she must clear all no-dues approval from certain departments. The HR department needs to send notifications to these departments regarding the culmination service of the staff.
Go to the School page under Administration >> Settings
Click Add button in the Notification / Dues Department
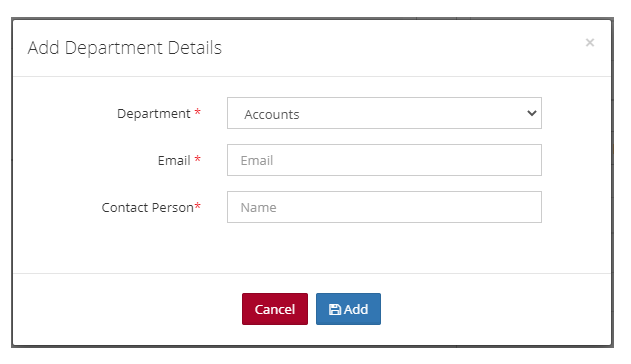
Add department details window opens.
Select the department from the drop-down, and enter the email address and contact person name. Click Add button.
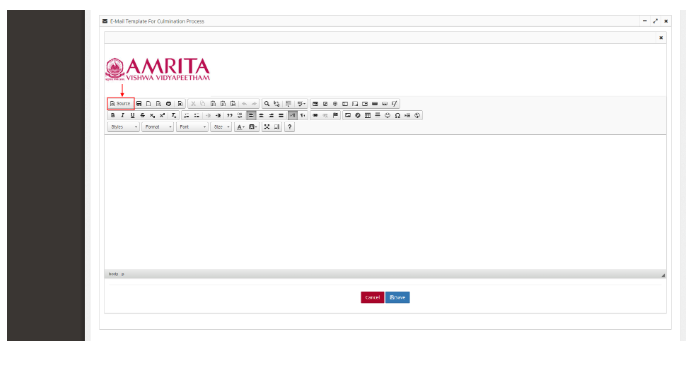
Add Email Template:
You need to add an email template for sending relieving letters to staff.
Go to the School page under Administration >> Settings
You can design/add your own email templates here.
If you have an HTML code,Click on the Source button to view in code mode.
Paste the code in the text area. Edit the code if required using the tools available in the tool menu.
Click on the Source button again to view the code in HTML mode.
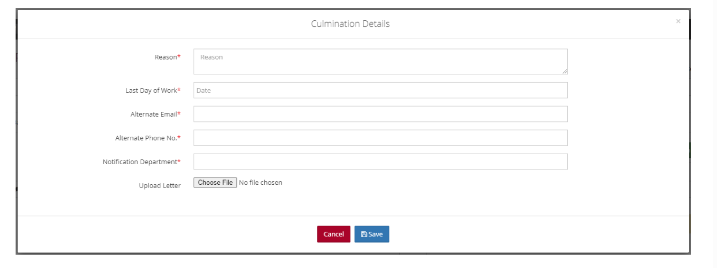
Start Culmination Process:
Go to the HR page of the staff.
Go to the Culmination of Service tab.
Click the Start Culmination button.

Add Reason, Last day of work, Alternate email, Alternate phone number, Notification / No Dues Departments, and upload any documents to attach.
Click on the Save button.
Once the culmination details window is saved, an automated email will be sent to all the No Dues departments. The culmination process will complete only after the No Dues Department approves the process.
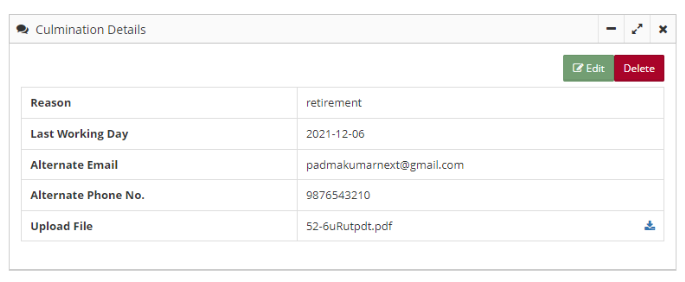
HR can Edit or delete the culmination process by clicking Edit or Delete button respectively.
There are three No dues notification status
Pending - Approval is still in pending status from no dues department. Email can be resend to remind again.
Approved - No Dues Department has approved the culmination process.
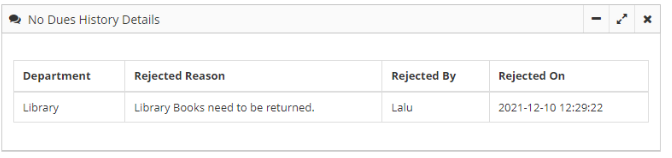
Rejected - No Dues Department has rejected the culmination process on the basis of pending dues.
Email can be resend after closing all dues. Rejection history will be displayed under No Dues History details.
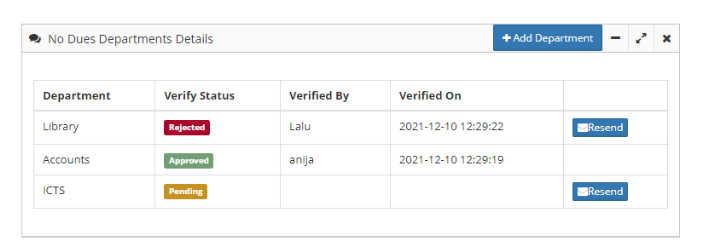
HR can add more No Dues Department for approval by clicking Add Department button in No Dues Department Details box.
No Dues rejection history is displayed in the History table.
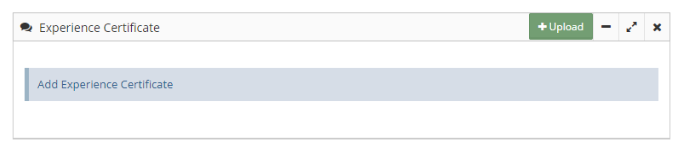
Once all the No Dues verification got approved, Click on the Upload button to upload the Experience certificate.
Once HR uploads the experience certificate, Send Relieving Order & Experience Certificate button will get displayed.
Clicking this button will send an email with relieving order and experience certificate to the alternate email id of the staff. The application uses the email template which we configured early for the relieving order.
HR can download the Relieving letter as a pdf by clicking the Download Relieving Order button.
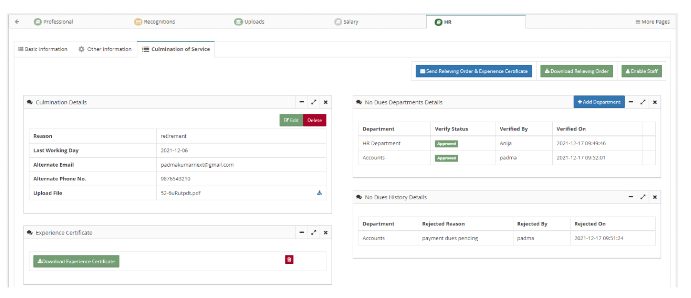
Staff status will get Disabled automatically once the Email with relieving order and experience certificate is sent.
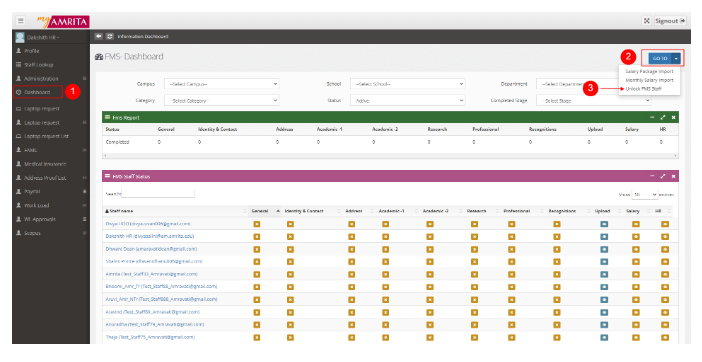
How does the HR admin view or edit staff's HRMS data?
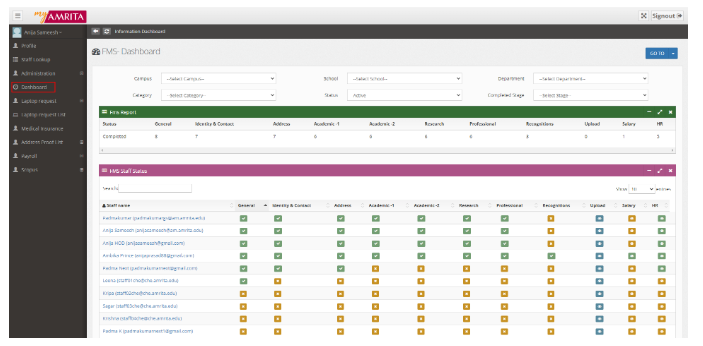
Click on Dashboard in the left menu. The dashboard page will be loaded.
You can use the filter at the top of the page as required to view the desired result.

The FMS Report - Campus Wise displays provides the count of staff/faculties who have updated their HRMS data campus-wise.

The FMS Staff Status table shows the staff-wise status. Those in green color tick are filled pages and those in the yellow cross need to be filled by staff.
The salary page and HR page need to be updated by the Accounts and HR departments respectively.

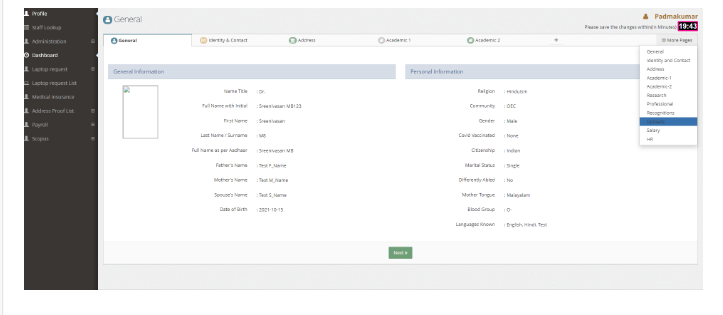
Click on the name of a staff name in the FMS Staff status table to open the General data page of that staff.
You can go through other pages except Upload, Salary, and HR only if the staff has updated them.
HR admin can edit the updated pages of the staff if required.
Basically HR department can insist the staff fill/update their HRMS data once in a while which may help the HR department to keep the data up to date.
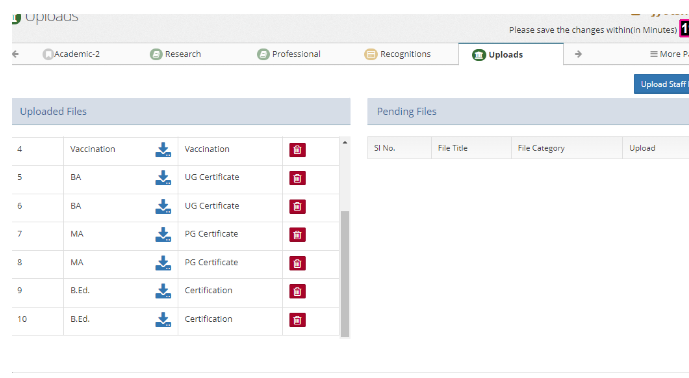
How to download Staff documents?
Go to the Dashboard
Click on the staff name and go to Upload session.
Admin can download the staff documents from here.